
Are you wondering how do
In this in-depth 6500+ words guide, I am going to explain all the necessary details to start a blog on WordPress.
- Choose a great blog topic
- Register a domain name for your blog
- Choose fast and managed Web Hosting
- How to create a blog in WordPress? (It’s free and SEO friendly)
- Setting up your WordPress site
- Blog SEO for higher Search Engine rankings
- Google, Bing webmaster tools
- How to verify WordPress blog URL with Google search console?
- Verify Domain ownership
- Social Media settings
- How to Automatically share your posts to social networks?
- Track site stats and back up and increase blog security with Jetpack plugin
- Jetpack Plans and pricing
- Performance, speed, and free storage
- Security and daily backups
- Traffic & Revenue
- Design your new blog with the great theme (We love X theme for WordPress)
- How to write a blog using WordPress?
- Join and promote affiliates to make a living blogging
- Final Words
It doesn’t matter if you are going to set up a personal or a business blog, We have covered it all in this blogging guide for absolute beginners.

How to start a money making blog?
Get eBook
This guide helps you to set up any type of blog from scratch without any technical knowledge.vv
We will also learn how to optimize a blog for search engines to get higher rankings in search engines like Google and Bing.
You’re going to be amazed that how simple and easy it is to create a blog from scratch with WordPress.
Never underestimate what your potential blog could achieve, You might start making money from personal blogs as well if you work hard enough.
On the other hand, business blogs are all about growing your business and revenue. We will also discuss important things to remember when setting up a business blog.
I am able to achieve my blogging goals and earn money from my passion.
In the beginning, it might be difficult for you to make money as a blogger but if you keep publishing great content regularly, within in a few months you will start earning.
HOW TO CREATE A BLOG FROM SCRATCH with WordPress to Make Money or grow your Business?
Here are a few necessary steps to create a personal or business blog from scratch in 2019.
Starting a blog on WordPress is a quick and easy process. You need to follow these steps:
- Choose a great blog topic
- Register a great domain name with Namecheap
- Choose a fast web hosting service like Kinsta or EasyWP
- Install & set up a blog with WordPress (It’s free and SEO friendly)
- Set up WordPress for best performance
- Blog SEO for higher Search Engine rankings
- Design your new blog with a great WordPress theme (We love X theme)
- Write & publish SEO optimized content
- Join and promote affiliates to make a living bloggin
1. Starting a Blog? Choose a great blog topic

There is a blog or blogs for almost everything from parenting to food to fashion. Here is a list of some popular blog topics.
- Recipes
- Politics
- Tech
- Parenting
- Beginner’s guides to anything
- Life Experiences
- Products or service reviews
- Family
- Gaming
- Travel Experiences
- Educational
- Charity
- Activism
- Music
- Humor
- Myths
- History
and Sports are quite popular blog topics but this is not a limit, you can choose any other topic you prefer.

Either write something worth reading or do something worth writing.
Benjamin Franklin
You may not be an authority on the blog topic (yet), but select something that you won’t get bored learning and sharing about.

With any blog topic, your choice may easily spread into other areas of interest. Don’t feel that the initial topic of the blog can’t be changed.
As a beginner blogger, Feel free to experiment with a few topics and see what matches best your interests and passions.
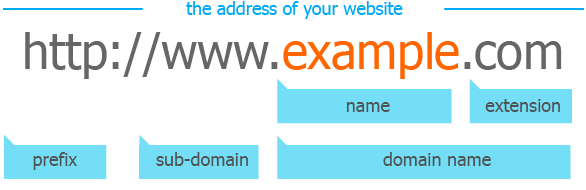
2. Register a domain name for your blog (.COM is the best choice)
A domain costs around $10/year and you can register it for up to 10 years at NameCheap. A dedicated domain name provider, we use to register and manage our domains.
Many Hosting companies offer a free domain name with hosting plan but I prefer to register new domain names with Namecheap because it makes it simple and easy to manage multiple domains and I can use any of my domain with any hosting service of my choice.
Namecheap makes it easy for me to manage all the domain names in one place. It does not matter which hosting provider you choose, You can use your domain name with any hosting provider.
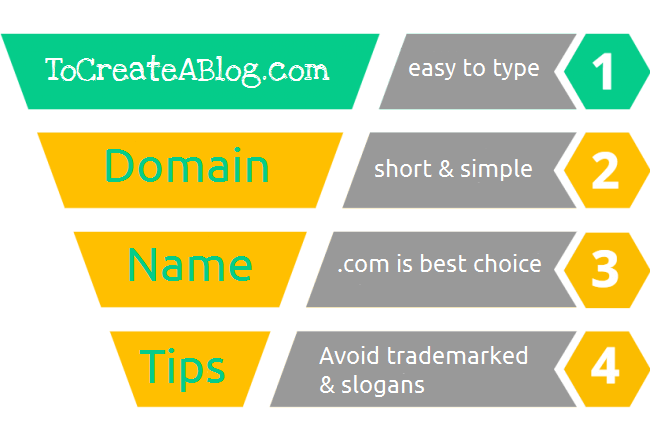
Here are few Domain name tips to remember before registering a domain name.
- Make sure it is easy to type
- Make sure your domain name is pronounceable
- Keep domain name short & simple
- Don’t use other company’s brand names or trademarked slogans.
- Try to use broad keywords
- Avoid number and hyphens in domain names
SSL Certificate and SEO
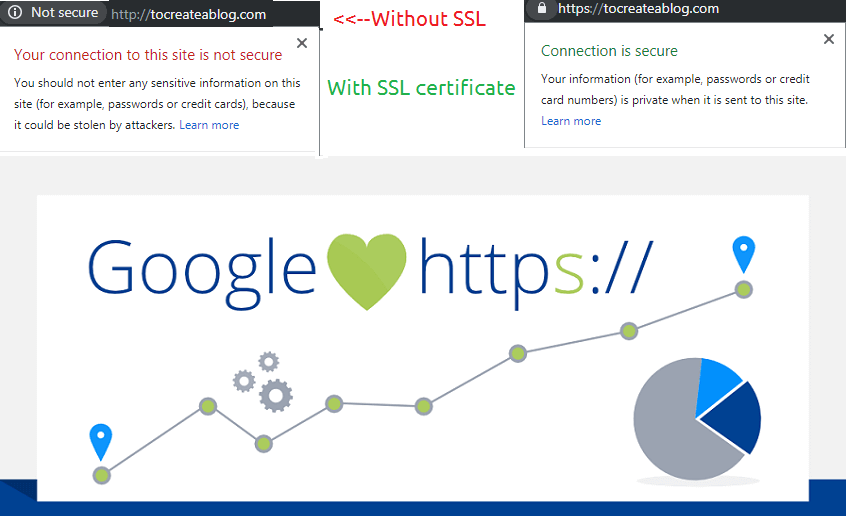
Namecheap charges only $10.98 for 2-year SSL certificate registration.
You can also buy an SSL certificate to protect your users’ data online with SSL security.
SSL certificate is not a must for a small personal blog but it is recommended for all type of blogs and sites.
Especially, If you are going to start a business blog or planning to sell products online, an SSL certificate is a must for your blog and business.
SSL certificate can also give you SEO boost. When you register a domain name at Namecheap, You can get a positive SSL certificate for only $1.99 for the first year.
How to Move entire site to SSL.: You can install Really Simple SSL plugin for WordPress to automatically detect your settings and configure your blog to run over https for better performance and security.
So go to Namecheap.com and register your domain name. With our affiliate link, You will pay only $8.88/year.
Type your desired domain name, if it is not available you can choose a variation of the domain name.
Click Add to cart button and you will be redirected to order confirmation page.
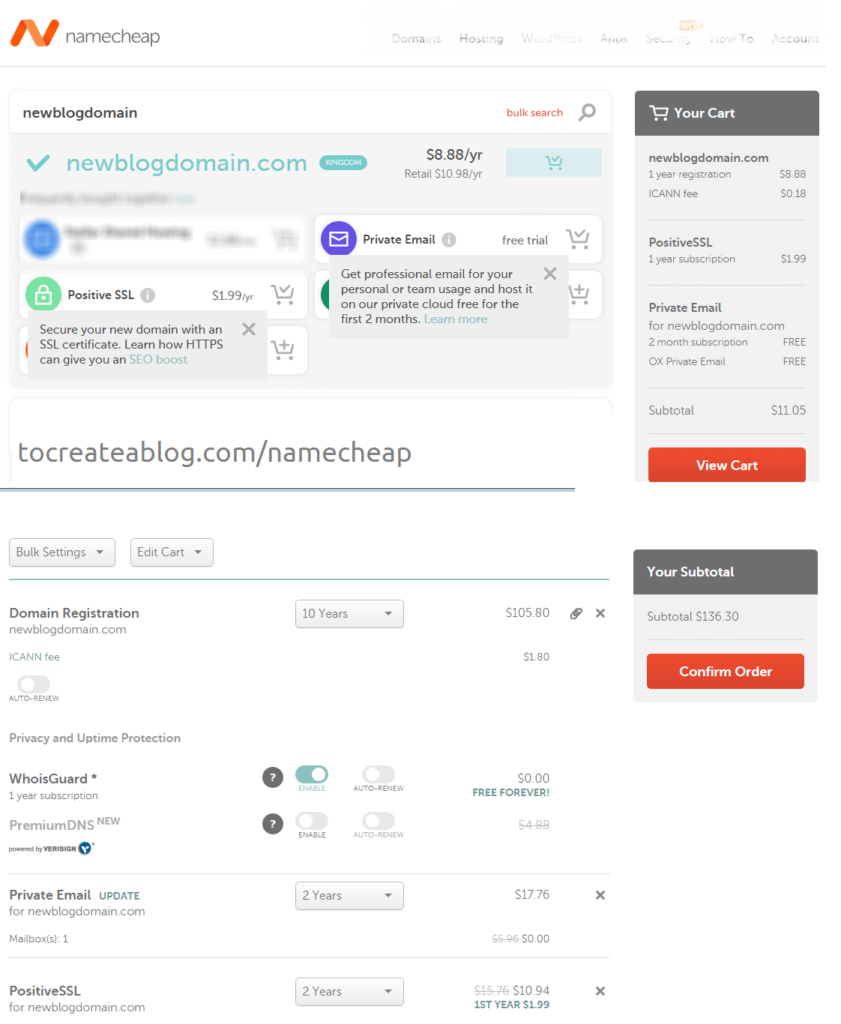
For 1-year domain name registration and SSL certificate, You only pay $11.5.
If you want to register this domain name for more than 1 years,
After choosing the desired duration for the domain, private email and Positive SSL certificate, complete the payment to register your domain name.
Your domain name will be available for use within a few hours.
Now we need to choose a fast managed WordPress hosting provider.
3. Choose fast and managed Web Hosting
Web hosting is a service that allows your blogs and websites to be accessed through the internet by other users.
Without a domain and web hosting, your blog won’t be seen online or get any traffic. The two are inseparable! There are plenty of web hosting companies to choose from.
Prices generally start from $10 month for shared hosting and $30 per month for the
Shared hosting plans are cheap but try to avoid them if possible because of security and speed issues. Websites on shared hosting are slow and sometimes takes too much time to load.
We recently moved our site justlearnwp.com from shared hosting service to Managed hosting service because our site was often facing downtimes and our readers were unable to access it.
Remember not only your visitors but Google also hates slow websites and if your blog is slow and not accessible, it won’t be easy to rank higher in Google.
If you want your posts to be on the first page of Google, make sure you choose a fast hosting service like Kinsta or EasyWP.
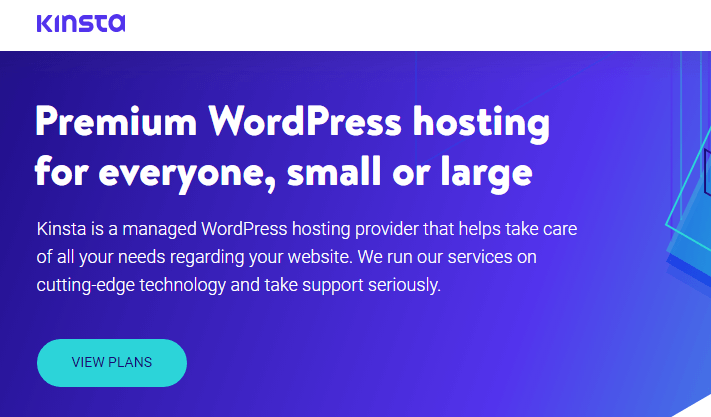
Kinsta – Managed WordPress Hosting for business blogs, and WooCommerce sites
Kinsta offers really fast Google cloud-based managed WordPress hosting service for business websites and blogs. Kinsta is offering different plans for small and large scale businesses.
If you are going to start a business blog, choose Kinsta as your hosting provider.
We will discuss more major difference between Kinsta and EasyWP later in this blogging guide.
EasyWP – Managed WordPress Hosting for small personal blogs and sites
EasyWP is a managed WordPress hosting from NameCheap, EasyWP has 3 different plans starting from $29.88/year to $98.88/year.
If you are starting a blog from scratch, You can start with EasyWP Managed Hosting, and once your blog starts getting high traffic, you can upgrade to a business plan or move to Kinsta which offers many great features for big business blogs.
4. How to create a blog in WordPress? (It’s free and SEO friendly)
Choosing a Blogging Platform
You can’t start the next big blog without blogging software.
Millions of people and businesses have been using WordPress for a decade to run their blogs because it’s user-friendly, free, and powerful on great for SEO as well.
As a rule of thumb, you should avoid most free blogging platform services. Why? They don’t give you full control over your blog that you’ll need to build and scale a powerful money-making blog.
On free blogging platforms like WordPress.com, Tumblr, Blogspot, You don’t ultimately control the blog’s content and features are limited as well.

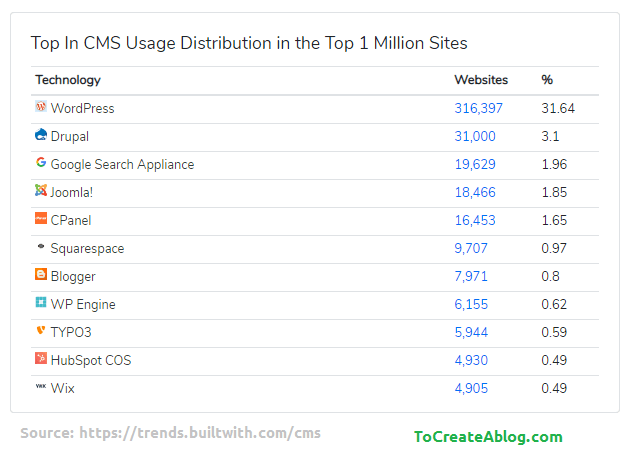
WordPress has been the king of CMS market for a long time. WhatCMS.org detection results show that WordPress has 52.65% CMS market share.
While trends.builtwith.com/cms shows that 31% of Top 1 Million Sites are using WordPress.
In fact, WordPress powers more than 30% of the entire internet.
The self-hosted version of WordPress gives you all the power, feature and flexibility you need to create a personal or powerful business blog.
We recommend you to self-host a WordPress.org blog with Kinsta or EasyWP.
Kinsta is great for WooCommerce stores and business blogs/sites. Kinsta is offering services for almost a decade.
EasyWP is good for personal blogs and small sites. EasyWP is a new service from NameCheap and currently in beta.
WordPress is a downloadable content management software that gives you full control over your blogs and websites.
WordPress is powering more than 30% websites on the internet.
How to set up a Business blog with Kinsta Managed WordPress Hosting?
For a personal blog, you don’t need to an expensive hosting plan but if you are starting a business blog, You need to choose a hosting plan that offers essential features to expand your business quickly and easily.
Business blogs, sites, and WooCommerce stores are very demanding, so you need a business experienced hosting provider that can handle anything.
Kinsta is offering hosting plans for business blogs. It has many additional add-ons to expand your business easily. While EasyWP is targeting small personal blogs and sites.
Here are a few great features that you only find on Kinsta.
- Speed obsessive architecture: Nginx, LXD containers, MariaDB, DDoS detection
- Hardware firewalls, Uptime monitoring
- SSL certificate support: EasyWP also has this feature.
- Google Cloud Platform
- Free site migrations
- Developers friendly: WP-CLI, SSH, Git
- Maximum speed: 18 global server locations
- WooCommerce hosting: optimized container-based hosting that is built for infinite scaling
- Optional add-ons: Cloudflare Railgun, Elasticsearch, Redis, Scale visits and CDN, Nginx reverse proxy
- Enterprise hosting Working with large volume sites is our specialty.
- Website Analytics: within Kinsta Dashboard. No need to use additional service.
With Kinsta Managed WordPress Hosting, You get all of the above-mentioned features.
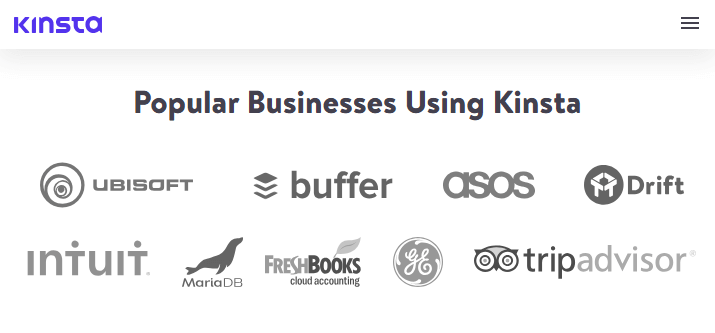
Kinsta is used by some very popular business blog including Buffer, Asos, FreshBooks, MariaDB, TripAdvisor, and many others.
So make sure to choose a super fast WordPress hosting provider that can handle large sites and high traffic.
Install WordPress on Kinsta in 2 minutes
Kinsta plans are starting from $30 /month, I am using Business plan 1 which costs $100 per month and I can create and manage 3 websites.
You can view Kinsta hosting plans here. Scroll down the page to view all the details and features of Kinsta. Then select a hosting plan to for your blog.
You can start with any plan of your choice to host your business or personal blog. Click the choose button and complete the signup process. Once you have purchased a plan.
Login to your Kinsta account.
This is Kinsta Dashboard, You can manage all your sites, clients, users and view stats for each of your blogs.
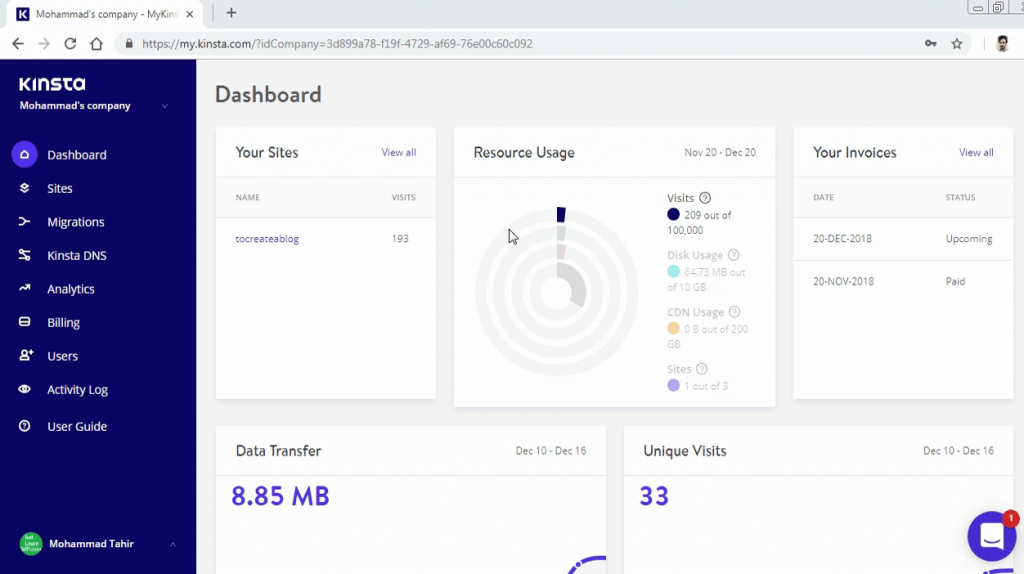
Kinsta gives you all the necessary features you need to create a great and super fast blog that will help you make a living from your blog.
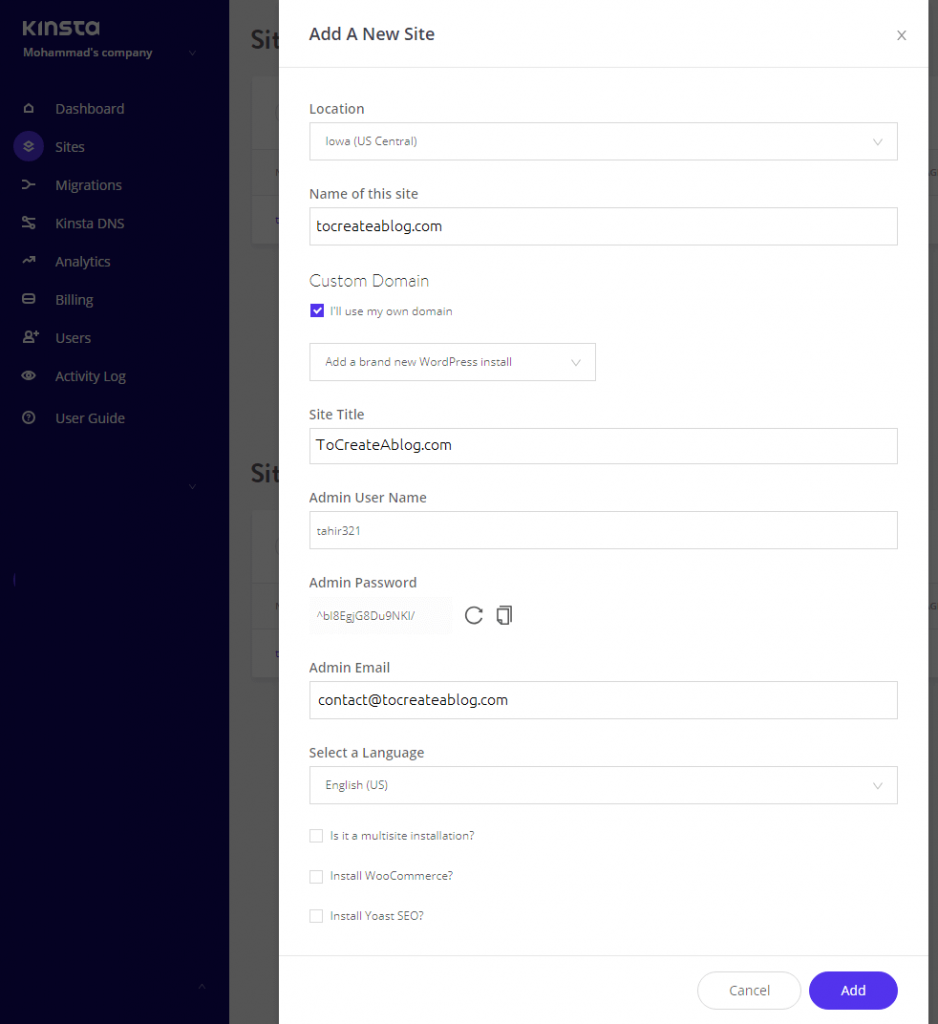
- Go to sites page and select Add your first site now button.
- Select the data center location from 16 different locations.
- Type name of your site
- Select I will use my own domain check box and type your domain name
- In the install mood, select “Add a brand new WordPress Install”
- Now add site title, choose a username and strong password.
- You can copy the admin password and save it in a notepad file or on your mobile phone.
- You need this password to login to your new WordPress site so don’t forget to save it.
- Type your email
- Select language
- From these 3 checkboxes you don’t need to select any option. WooCommerce and multisite installation are not required for our new blog. We will use JetPack SEO tools for site verification leter.
- Click the add button to set up a new site. Kinsta will take a few seconds, once the process is complete you will receive an email from kinsta.
- Now click on the new site name to view all the details of your newly created site. You will this page.
- To login to your WordPress dashboard, click on the domain link.
- Click on Domains
- Click OPEN URL button to view your website.
- Click OPEN WORDPRESS ADMIN button to log in to your WordPress dashboard.
- Type username and password that you saved earlier to access your WordPress Dashboard.
Pointing your domain name to Kinsta
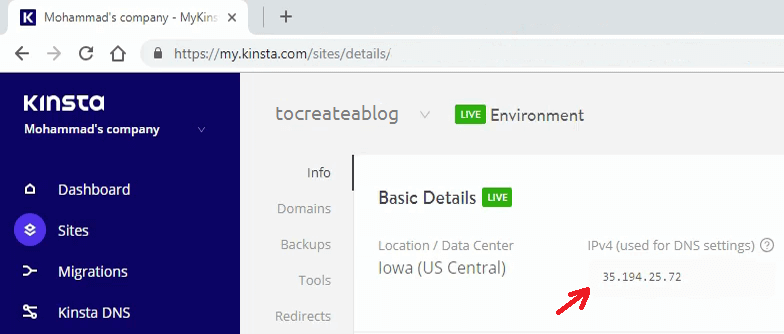
From the Kinsta Dashboard, Go to Sites page and click on your site name to view all the details about your new blog.
Click on the info page and copy IPv4 (used for DNS settings) address.
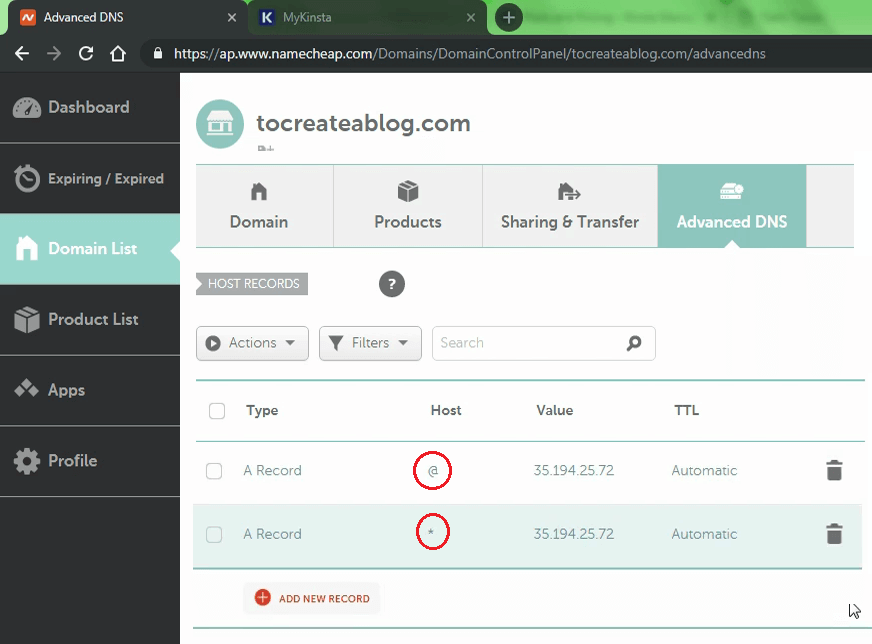
Now login to Namecheap account. Go to the Domain List page. Click Advanced DNS tab.
Delete any existing records and add two new A Records.
IPv4 value will be the same for both A Records but use @ as the Host value for the first record and * for the second A Record.
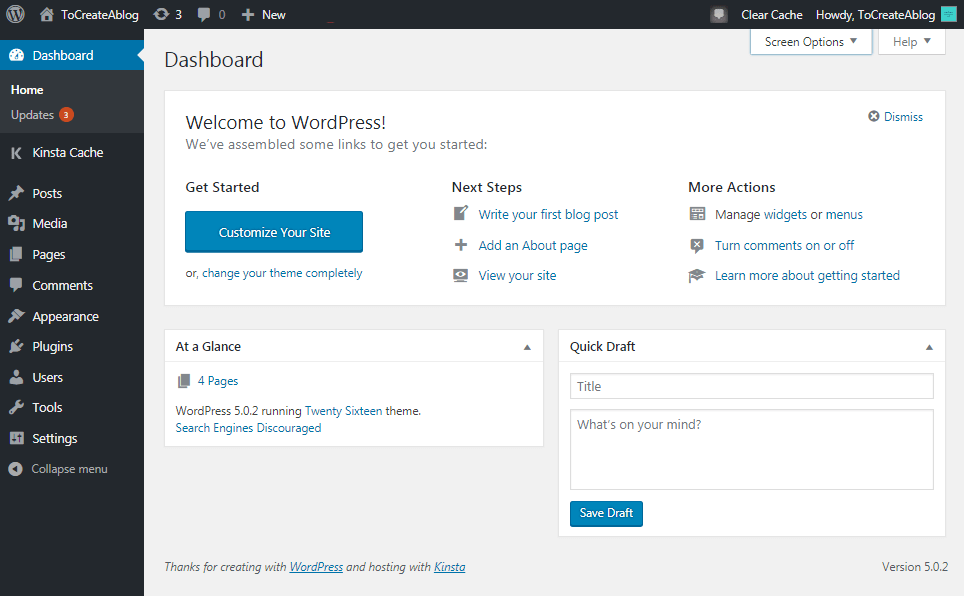
After adding these two new A Records, wait for the few minutes. Once your Domain name record is updated, You will be able to access your WordPress blog Dashboard by typing http://yourdomain.com/wp-admin
In the screenshot below. You can see the WordPress dashboard, It is the backend of your blog, only you can access this area.
From the WordPress dashboard, You can create, edit, change posts, pages, plugins, and themes on your blog.
In the sidebar, You can see Kinsta Cache link. WordPress cache plugins are quite popular to increase blog speed.
But on Kinsta, You don’t need to install any caching plugin. Kinsta has its own powerful caching system.
For the additional features, you can install a plugin and to change the design of your site, You can add a new theme.
How to start a personal blog with WordPress on EasyWP in 2 minutes?
If you are going to start a personal blog and don’t have a big budget, You can start a small site and personal blog with EasyWP Managed WordPress Hosting by Namecheap.
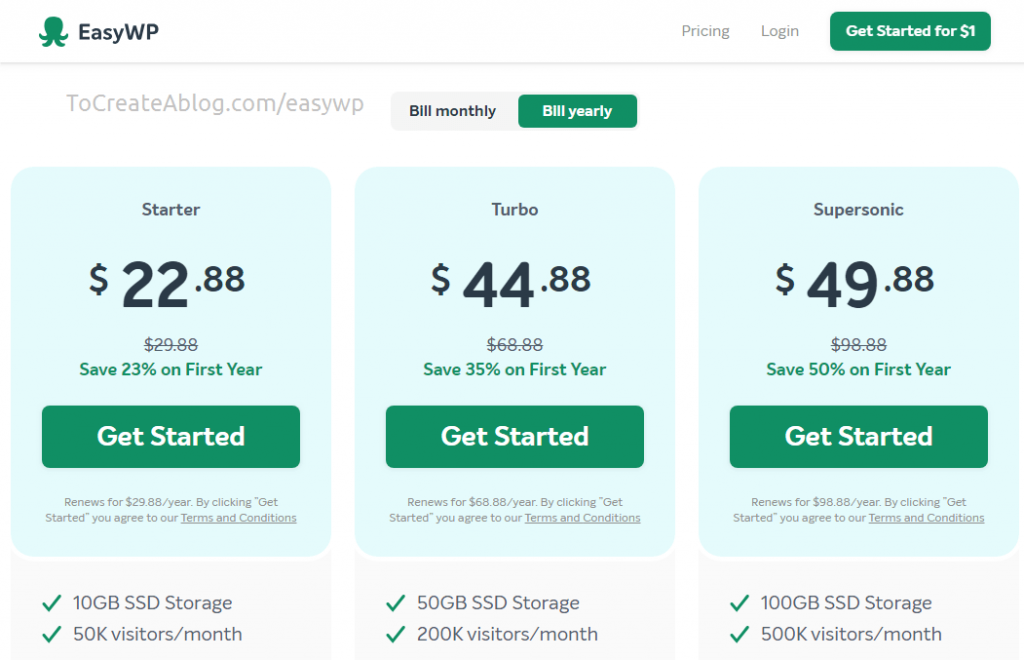
EasyWP is offering 3 different plans to host your WordPress blogs and sites.
- Starter plan costs only $22.88 (*$29.88)
- Turbo plan costs only $44.88 (*$68.88)
- Supersonic plan costs only $49.88 (*$98.88)
*: For the first year.
NOTE: * symbol shows renewal price for each plan.
Here is a list of EasyWP features.
- 1x WordPress website installed and ready to go
- Powered by Namecheap Cloud
- Manual Backup and Restore
- SFTP Files Access
- Temporary EasyWP free domain
- Support for your Namecheap domains
- 30-days money back guarantee
- 24/7 Namecheap Support included
EasyWP does not offer free migrations, If you have a small site, You can use All-in-One WP Migration plugin to import and export your site.
If the database file size is more than 512MB, you will have to pay $99 to increase the file size limit.
If you choose Kinsta, you don’t need to worry about migrations, Kinsta offers free site migrations.
EasyWP does not allow you to choose data center location and does not offer optimized WooCommerce hosting.
So which hosting service, you should choose EasyWP or Kinsta.
- Choose Kinsta for business blogs, sites, and WooCommerce stores
- Choose EasyWP for small blogs and sites
Install WordPress in few clicks using EasyWP Dashboard
Sign up for EasyWP hosting plan You will receive an email with your login detail. login to your EasyWP dashboard.
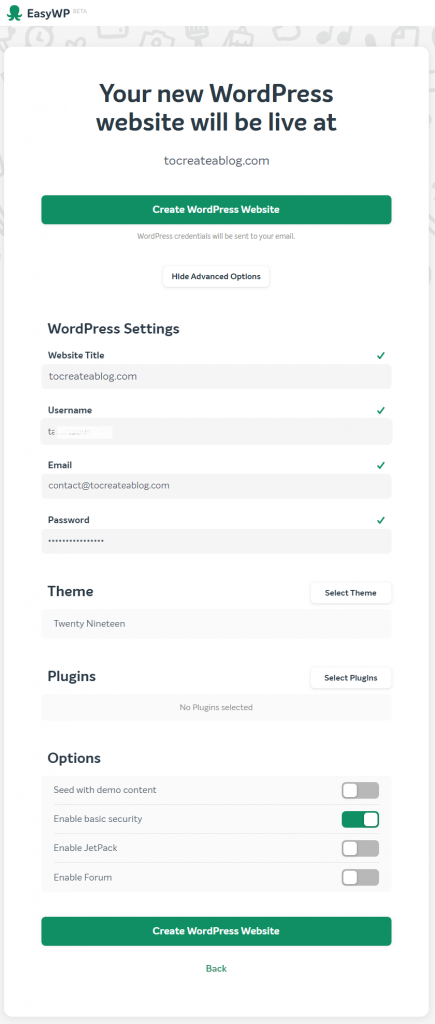
Click on the Setup WordPress button.
choose a domain name from custom domain list or you can choose a temporary EasyWP domain.
You can add a custom domain later as well.
Add basic info such as site name, username, password and click the Create WordPress Website button.
EasyWP will take a few seconds to set up your new WordPress blog. Once your site is ready. You can log in to your WordPress Dashboard with the email and password you chose earlier.
Just like Kinsta, EasyWP also has its own caching system to improve the performance of your blog. If you will try to install a caching plugin. You will see the following warning message.
EasyWP notice: This plugin is not necessary since EasyWP already has its own cache.
It does not matter, which hosting provider you choose from EasyWP and Kinsta, once your WordPress blog is ready, we can start customizing our blog to personalize it.
So let’s learn what you need to do after installing WordPress.
5. Setting up your WordPress site
Once your WordPress blog is ready. You need to change some of the WordPress settings to make it your own.
15 mistakes most new bloggers make when setting up a blog with WordPres
Here is a list of some most important things, you need to do after installing WordPress.
- Clean up Dashboard, hide unwanted widgets
- Delete default post, and sample page
- Rename default category to something related to your blog
- Change the permalink structure under Settings > Permalinks
- Create welcome post, about us page
- Update your profile, and bio
- Go to Appearance > Customize > Site Identity and upload your logo. You can Get a custom logo from Fiverr.
- Create a free WordPress.com account and join Gravatar. Add your profile picture. Your Gravatar is an image that follows you from site to site appearing beside your name when you do things like comment or post on a blog.
- Update privacy page and information under Settings > Privacy
- Create an affiliate disclosure page
- Update time zone, and tagline under Settings > General menu
- Delete default Akismet and Hello dolly plugins
- Go to Plugins > Add new, Search for LH Zero Spam. Install and activate this very lightweight anti-spam plugin.
- Install Jetpack in one click, a must have and very powerful WordPress plugin from the WordPress team.
- Create a contact page using the jetpack contact widget feature.
- Create your first blog post, optimize it for SEO using Jetpack Search engine optimization
- Create a primary menu for your blog
Once, You are ready to publish your first blog post, Go to Settings > Reading and uncheck Discourage search engines from indexing this site.
6. Blog SEO for higher Search Engine rankings
Best SEO Settings to optimize your blog posts for higher Search Engine rankings
If you want to rank higher in search results, You need to optimize your content and blog for better search engine rankings.
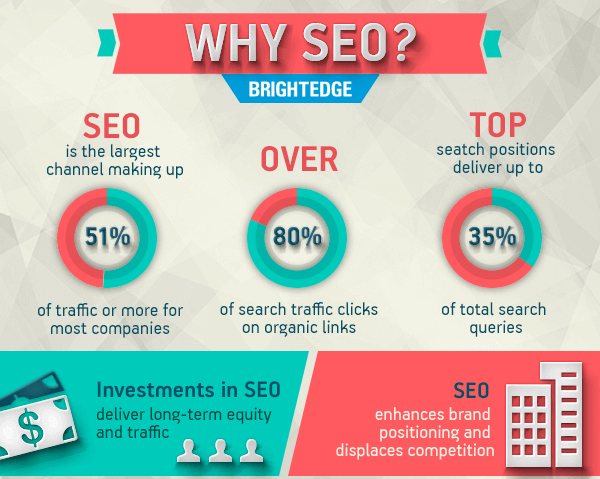
You have already bought a fast WordPress hosting for a fast blog but now it’s time to optimize the blog for SEO.
Google, Bing webmaster tools
Create an account on Google webmaster tools and Bing Webmaster tools and add your blog URL to Bing and Google search console.
Bing and Google webmaster tools let you track your blog’s search performance with Google Search Console. You can browse around for more webmaster resources as well.
Don’t forget to add your domain name with and without WWW in Google search console. If you are using an SSL certificate for your personal or business blog, add URL with HTTP and HTTPS.
After adding the domain name to Google and Bing webmaster tools, You need to verify that you actually this domain.
How to verify WordPress blog URL with Google search console?
There are different ways to verify that you own the domain name.
These are few different ways to verify that you actually own the domain with Google and Bing webmaster tools.
- HTML file: Upload an HTML file to your website using FTP or cPanel
- Google Analytics: Use your Google Analytics account
- Google Tag Manager: Use your Google Tag Manager account
- Domain name provider: Edit your domain DNS settings
Once you have added your blog URL to Google and Bing webmaster tools. Go ahead and
Verify Domain ownership with JetPack
Install Jetpack in a minute. Go to Jetpack > Settings > Traffic. Scroll Down the page. Activate Site verification and Sitemaps.
On this page, You can verify your URL with Google, Bing, Pinterest, and Yandex Webmaster Tools.
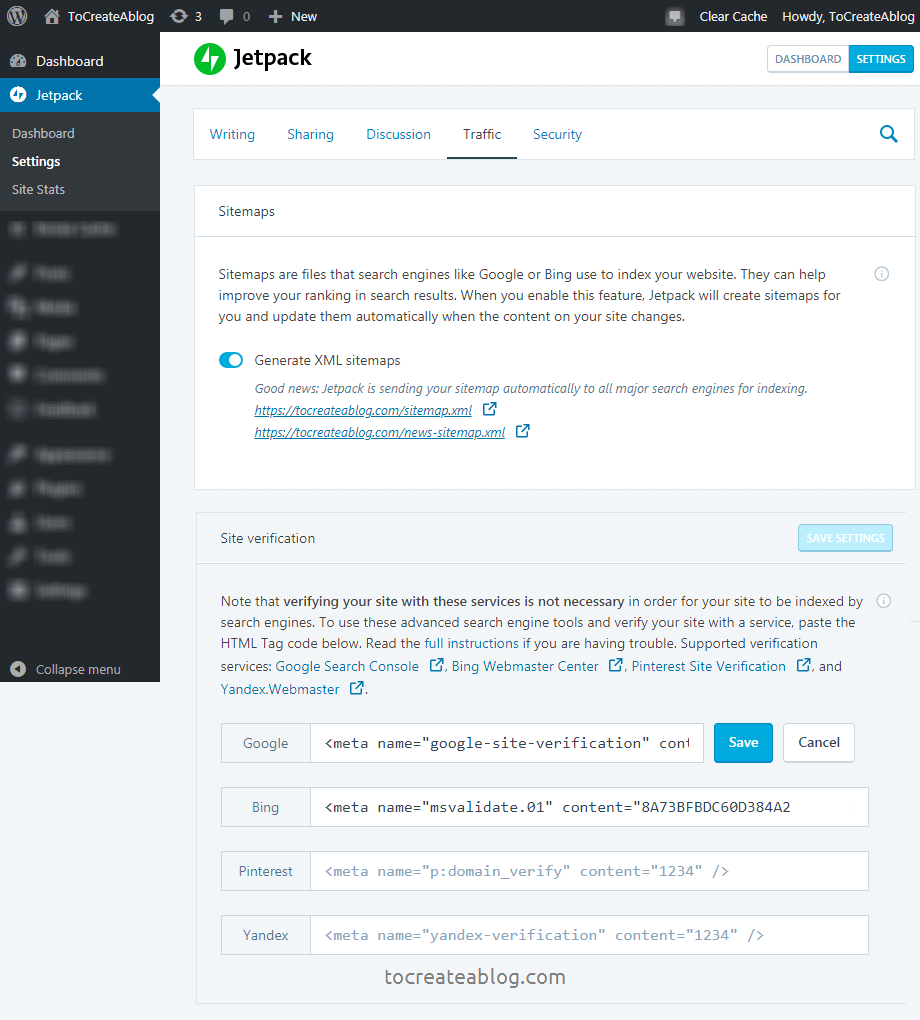
Now just copy the HTML tag from Google Search console and other webmaster tools, and paste the code in each field.
Or you can click on each Search engine link and follow the steps to verify your blog.
Click on Generate XML sitemaps button generate the XML sitemaps.
Copy XML sitemap link and add this link to Google, Bing, and other webmaster tools.
Social Media settings
Create Twitter, Facebook, Google+, Instagram, Pinterest and YouTube account for your blog. You don’t need to create an account for all these websites, just that suits your blog and business.
If you are going to blog about photography, You should definitely create Instagram and Pinterest accounts.
If you are going to share video reviews, Create a YouTube channel for your blog and add a YouTube subscription button to your blog sidebar and each video post and ask your blog readers to subscribe to your channel.
How to Automatically share your posts to social networks?
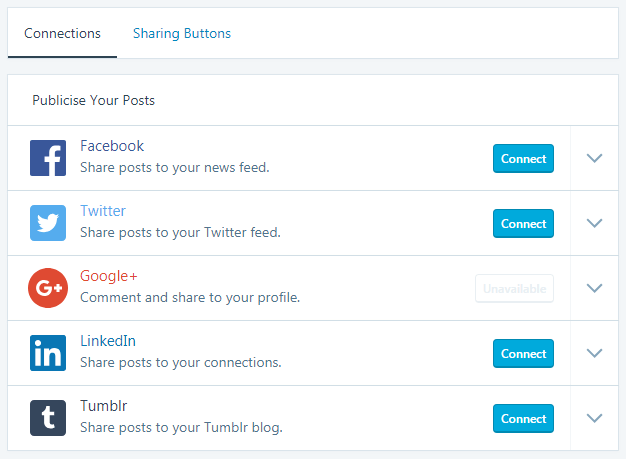
After setting up social media pages and channels, Visit WordPress Dashboard. Go to Jetpack Settings > Sharing page.
You can connect following social networks to automatically share latest blog post on social networks.
- Tumblr
- Google+
Click on the connect button to see the details and connection settings.
Jetpack Social Sharing: Go to Jetpack > Settings > Sharing page and Connect your social media accounts to automatically share your blog posts to social networks like Twitter and Facebook.
Social Media Menu: If your theme has a Social Media menu option. Create a new menu and add all social media links so your blog readers can easily connect with you.
Track site stats and back up and increase blog security with Jetpack plugin
Before we dive into details, let me tell you that Jetpack is developed by Automattic, the company who developed WordPress software and later started WordPress.com with it. So, You can trust this plugin.
You need to make sure that your blog is fast, looks great, secure and safe before you publish your first blog post.
Security and backups can’t be ignored because bad guys are always trying to get access to weak sites.
There are dozens of free and premium plugins and services available for WordPress bloggers to make blog safe, secure and super fast.
One of the best and most affordable solutions is JetPack. It has all the features that you need to start and manage a blog that matters for you and your readers.
You don’t need to buy 5-6 different plugins for backups, security, Brute force attack protection, Automated malware scanning, speed, and image optimization, video hosting and more.
Jetpack Plans and pricing
The Jetpack basic plan is free, pro plans are very affordable and offer advanced features.
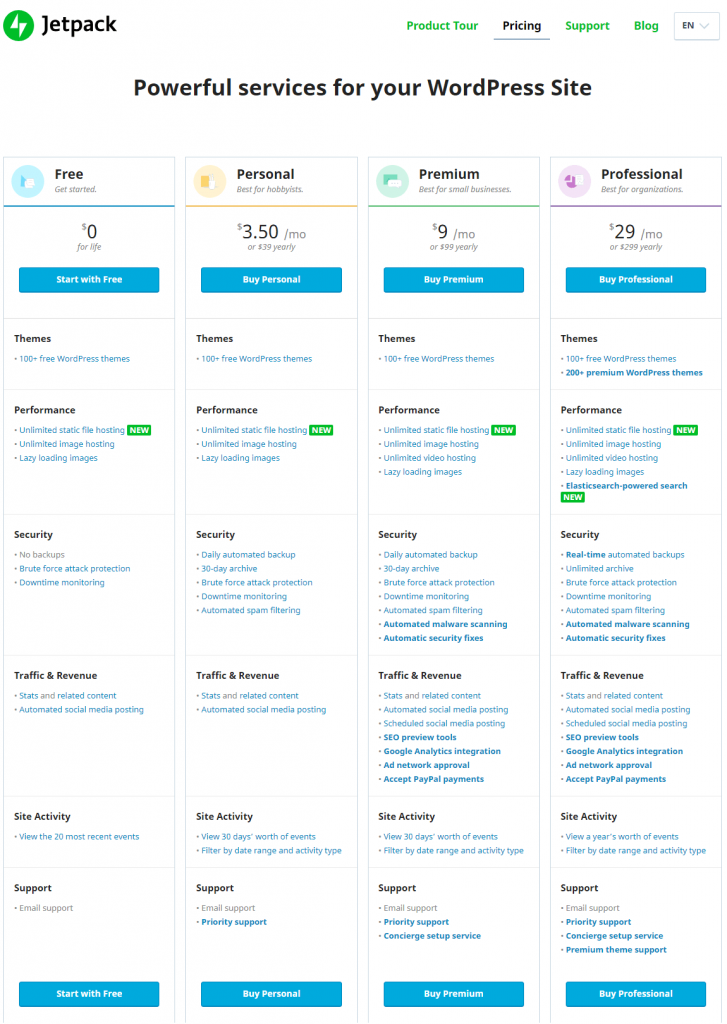
Normally a single plugin costs $60-$100 for a single site, It means, You will have to spend at least $500 on these plugins.
But Jetpack the ultimate plugin offers very affordable plans starting from $3.50 /month to $29/month.
The best plan is Jetpack Premium, great for small businesses and blogs. It costs only $9/month or you can pay $99 yearly to save $10.
Here is a list of some of the features that you will get with Jetpack premium plan.
Performance, speed, and free storage
Hosting large compressed files, images, specially videos can really slow down your blog. With Jetpack Premium, You can host all type of media and files without affecting your blog speed.
With JetPack you get
- Unlimited static file hosting
- Unlimited image hosting
- Unlimited video hosting
- Lazy loading images for super fast blog
Security and daily backups
Backups and site security are must for all type of blogs and sites, it does not matter if you are just starting a blog or getting a million views.
Popular WordPress security plugin Sucuri costs $199/year, and iThemes Security Pro costs $80/year for basic plans.
Popular WordPress backup plugins BackupBuddy costs $80/year, while UpdraftPlus costs $42/year.
It means, If you buy one least expensive backup and one security plugin, you will have to pay $122/year for just these 2 plugins, while Jetpack Premium costs only $99/year and has dozens of other premium features + You can make money with ad program.
- Daily automated backup
- 30-day archive
- Brute force attack protection
- Downtime monitoring
- Automated spam filtering
- Automated malware scanning
- Automatic security fixes
Traffic & Revenue
• Stats and related content: See which blog is getting the most traffic, total visitors, views and other statistics of your visitors
• Automated or Scheduled social media posting: Share latest and earlier blog posts with Twitter, Facebook, Instagram, and other channels
• SEO preview tools: See Live previews of what your blog homepage and blog posts look like on search engines like Google and Bing
• Google Analytics integration: to measure your advertising ROI as well as track your blog statistics
• Ad network approval: You can make money from your blog traffic with WordPress.com ads
• Accept PayPal payments: Boost revenue by selling products and services
7. Design your new blog with the great theme (We love X theme for WordPress)
Design of your blog should be elegant, choose a theme wisely. Make sure it is fast, up-to-date, has a great design and easy to customize.
“Design is not just what it looks like and feels like. The design is how it works.”
Steve Jobs
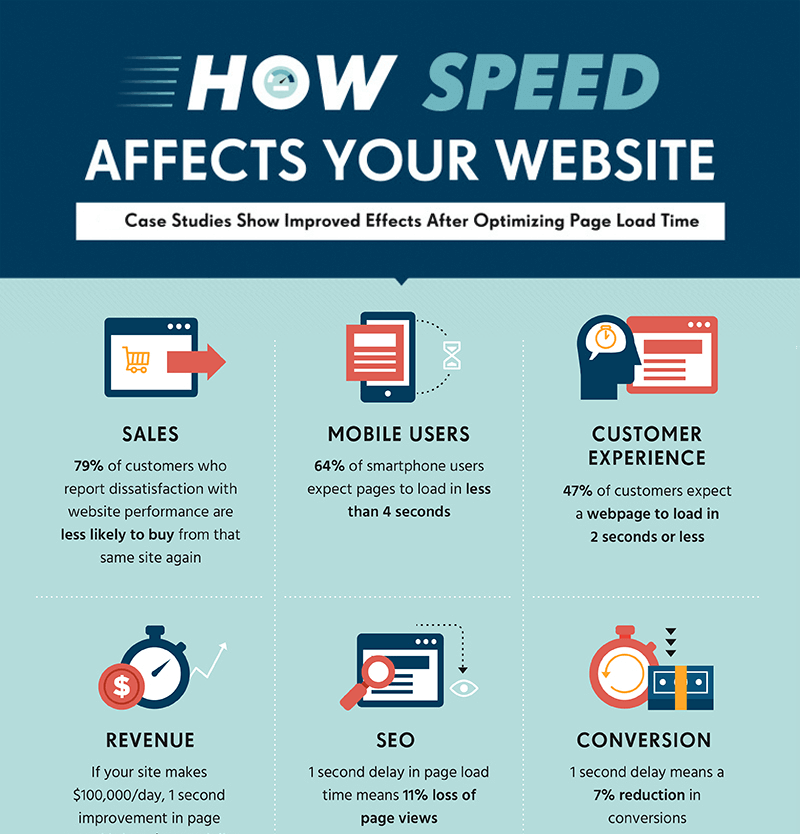
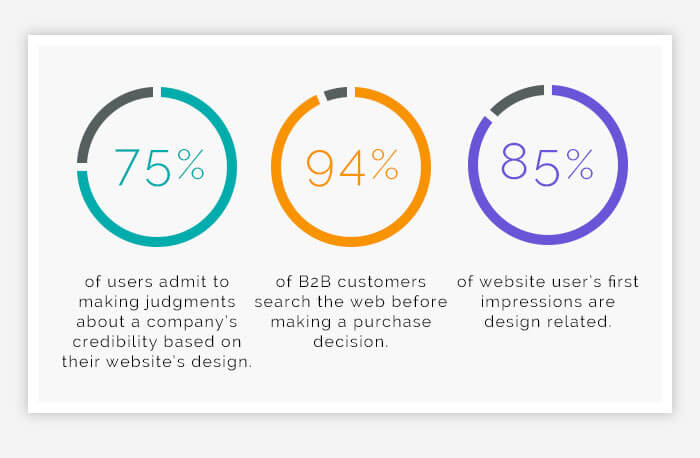
The design of your blog is very important and play a very important role to grow your business and blog. Here are few stats about blog design.
WordPress has thousands of free and premium themes. You can go with a free theme, if you are low on budget but make sure to use a theme from the trusted developer and your free theme was updated recently.
Free themes lack support and updates for the latest WordPress version as well and you can not customize your theme completely to make a unique looking blog.
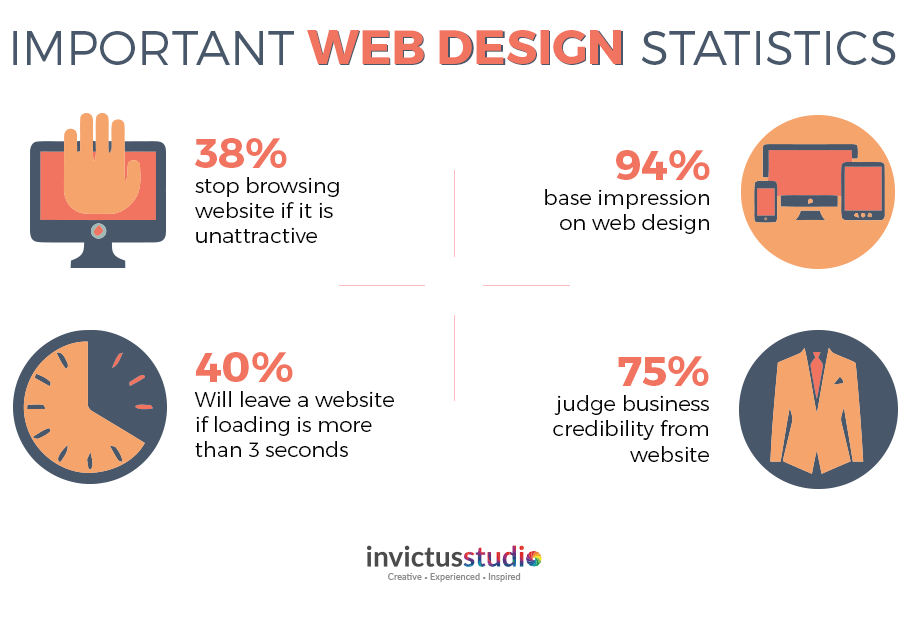
- 38% stop browsing website if it is unattractive
- 94% base impression on web design
- 40% will leave a website if loading time is more than 3 seconds
- 75% visitors judge business credibility from website
Premium/paid WordPress themes offers support, full control and customization, and great design. You can easily import premade layouts to quickly create and set up an elegant looking blog.
Premium themes also come with many premium plugins, which saves you hundreds of dollars, You might not need all of the available premium plugins but you can use them if you need.
X Best Selling WordPress Theme
X Theme is one of the best selling WordPress theme of all time at ThemeForest. With more than 195,743 copies sold at the time of writing this blogging guide.
X Theme comes with nearly 30 premium plugins and updates are free for both extensions and theme.
Inline editing, template manager, premade layouts, action history, custom fonts are a few of its features. Visit X Theme page to view all the available features and demos of this powerful WordPress theme.
After downloading X Theme, login to WordPress dashboard. Go to Appearance > Theme > Add new and upload your theme.
After installing X Theme, activate your theme and customize it to create a unique looking blog. This process takes only a few minutes.
X theme has dozens of pre-made templates. You can import any pre-made layout of your choice to quickly create an elegant looking business website and blog.
Download X Theme here || View XTheme Demos
8. How to write a blog using WordPress?
Write & publish high-quality SEO optimized content
Now, Our blog has been set up completely. It’s time to start writing and publish great content that is not only optimized for Search engines like Google and Bing but also optimized for our targeted audience and blog reader.
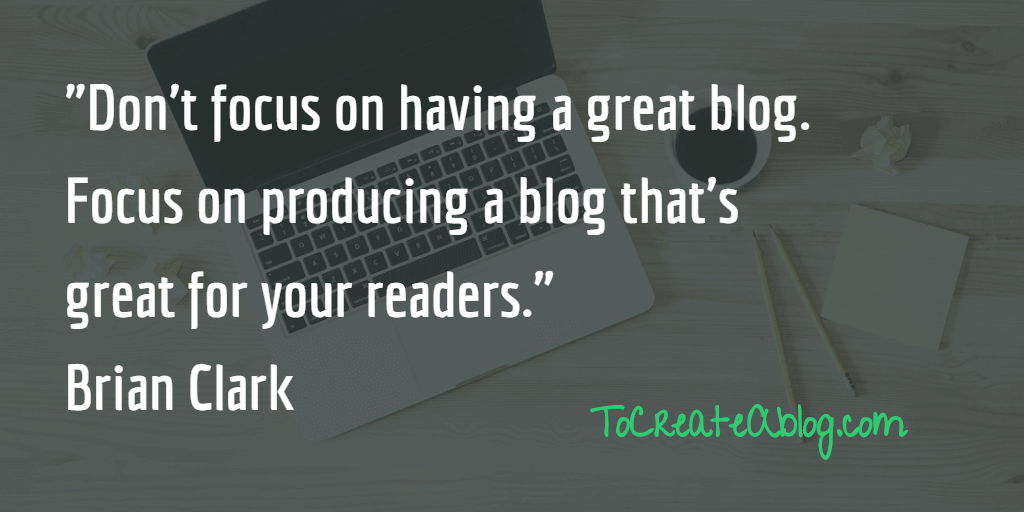
Don’t focus on having a great blog. Focus on producing a blog that’s great for your readers.” Brian Clark
Blog design matters but keep in mind readers need quality content, that will help them to learn something new. So make sure you don’t waste too much time and energy on having a great blog design.
Just choose a premium theme such as X Theme and import a premade layout to quickly set up an elegant blog in a few minutes.
Here are few key elements to great content
- Original content
- Optimized for readability
- Catchy post titles
- Great visual included
Before writing content, research. Find out what people are looking for.
Use free tools like soovle, keywordtool.io and Moz explorer for keyword research. Simply type a word or two to see related keywords.
Once you have found the keywords, You can start writing SEO optimized content.
Read articles about the topic, You are going to write about. See what ranks higher in search engines. Observe the writing style, length, images.
Write short paragraphs, use lists, block quotes, proper headings. Use simple language. Don’t use difficult words in your articles.
Make important points bold to highlight them.
Use keywords within your article, but don’t add them unnecessarily. Use a variation of the main keyword.
Use titles subtitles properly. Use H1 for Article title, H2, and H3 for other subheadings in the article.
Write catchy headlines for your blog posts.
On average, 8 out of 10 people will read headline copy, but only 2 out of 10 will read the rest. This is the secret to the power of your title, and why it so highly determines the effectiveness of the entire piece.”
CopyBlogger
Use the following headline generator tools to create catchy blog post titles for every blog post you publish on your blog.
Use great visual in your blog posts
Images are a really important part of blogging.
Humans are visual animals. According to psychologist Albert Mehrabian, 93% of all communication is nonverbal. Since the beginning of time, we’ve been programmed to engage, react, and interact visually.

- 90% of information transmitted to the brain is visual
- Visual are processed in 60,000X faster in the brain than text
- 40% people respond better to visual information than plain text.
Always create visually appealing images for your blog posts, Twitter, Facebook, YouTube, Instagram and, Pinterest.
Use tools like Pablo to create visually appealing images for Twitter, Facebook, Pinterest and blog post featured image. You can upload your own images or use thousands of free images.
Canva is a great free tool to create large size images for Pinterest and infographic.
Gravit Designer is a full-featured cross-platform vector design app. You can use it online to download it.
Social media image size is not the same. You can use landscape by SproutSocial to easily crop images for your desired social network.
Reduce image and video file size without losing quality
Large images can really slow down your site even on a managed WordPress hosting service, but luckily there are many tools and online services available to reduce the image and video file size without losing quality.
Compress images and videos before uploading them to your blog or YouTube channel.
TinyPng is a free service to reduce image file size without losing the quality of your beautiful images. You can upload up to 20 images maximum 5 MB each at a time.
Jetpack’s Site Accelerator (formerly photon) feature helps your pages load faster by allowing Jetpack to optimize your images and serve your images and static files (like CSS and JavaScript) from our global network of servers.
You are ready to publish your great content.
Now follow the above-mentioned guidelines and write a few blogs posts. Optimize each blog post using Yoast SEO or Jetpack SEO preview tools.
Customize meta descriptions for individual posts and pages. Create a front page meta description and edit post titles for search engines.
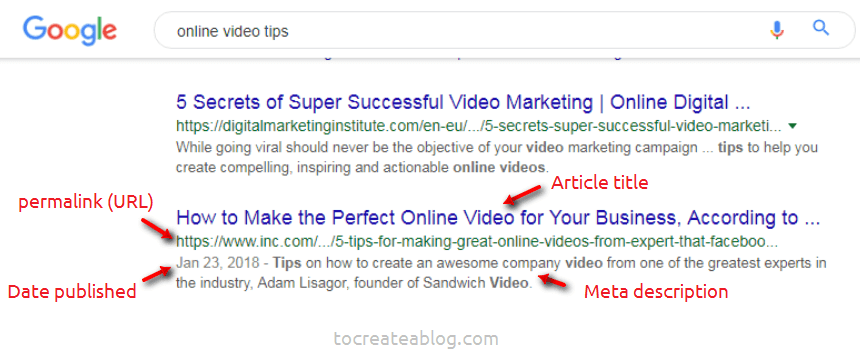
In the screenshot above, You can see how a post optimized for search engines looks like in Google search results.
Once you have optimized your blog posts for search engines, You are ready to publish them.
Before hitting the Publish button, go to Settings > Reading page and uncheck the Discourage search engines from indexing this site.
If this box is already unchecked, You can publish your blog post, Otherwise, Search Engines won’t show your blog in search results.
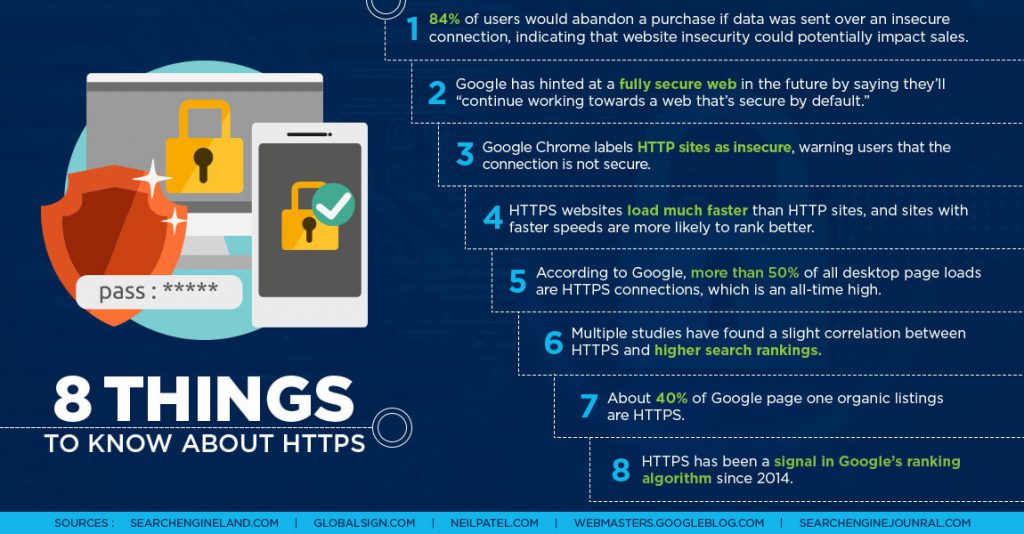
Don’t forget to Get an SSL certificate and install Really Simple SSL plugin for WordPress to run your entire site over SSL.
Really simple SSL plugin will configure your website to run over HTTPS://yourdomain.com instead of http://yourdomain.com
You’re starting a new personal or business blog, so it’s a good practice to have HTTPS in place from day 1 because. It does not cost too much.
9. Join and promote affiliates to make a living blogging
Affiliate marketing is one of the best ways of making money from blogs.
First of all, you need to join some affiliates in your industry and then promote them by writing reviews or publishing videos on YouTube.
It does not matters which topic you chose for your blog. You can find a lot of products to promote.
For example, In this in-depth blogging guide, we have added few affiliate links to some services. It means, at no additional cost to you, We will earn a commision if you purchase with our link.
These aren’t relevant or cheap links. To create a blog, You need a domain name, hosting, theme, and few WordPress plugins as well.
So we have added links to following highly-reputable services.
- Namecheap: Domain name registrar
- EasyWP: Affordable Managed WordPress hosting from NameCheap
- Kinsta: Google cloud-based Managed WordPress hosting for business blogs and enterprise with advanced features
- JetPack: Powerful services for personal and business blogs by WordPress.com
Above mentioned all links are offering high-quality services. All services have a very good reputation and offering services for over a decade.
So when you join any affiliate to promote, do some research and make sure to promote and recommend quality products and services only to your readers.
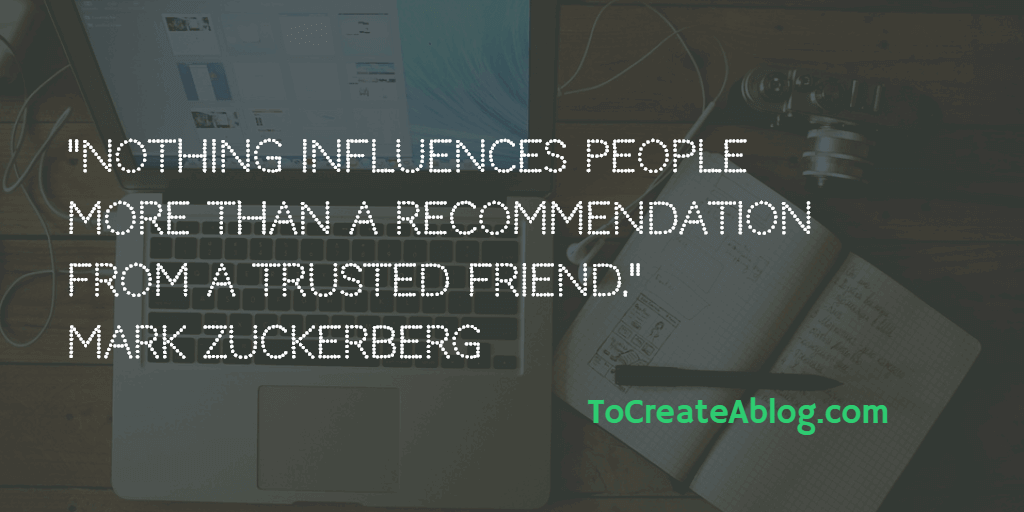
You are going to be that trusted friend of your blog readers. So don’t cheat them. Recommend what you trust.
We often write and publish reviews on our sister blogs. We try the product and service before writing the review. Once we are satisfied with the service, we add affiliate links in the article.
How much can you earn with Affiliate programs?
Every program offers a different commision rate. Normally you get 5% to 30% commissions for each referral.
Amazon.com Affiliate program offers up to 10% in advertising fees and for other categories, you can earn
- 10% on Luxury Beauty
- 8% on Kindle and Fire Tablet Devices
- 8% on Furniture, Home and Garden
- 7% on Echo and Fire TV Devices
- 5% on Digital Music and Videos
Most WordPress themes and plugins developers offer 15%-30% commission on each sale.
How to make money from your blog with Affiliate marketing?
Some affiliate networks check the blog’s content and quality before approving the sign-up request, so make sure to write and publish some high-quality articles and reviews on your blog.
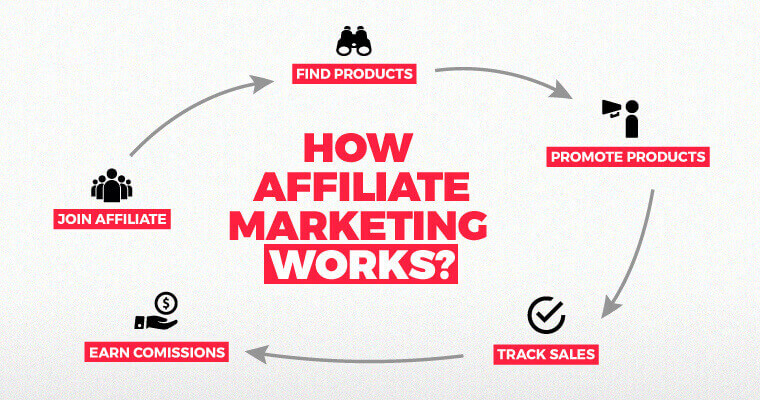
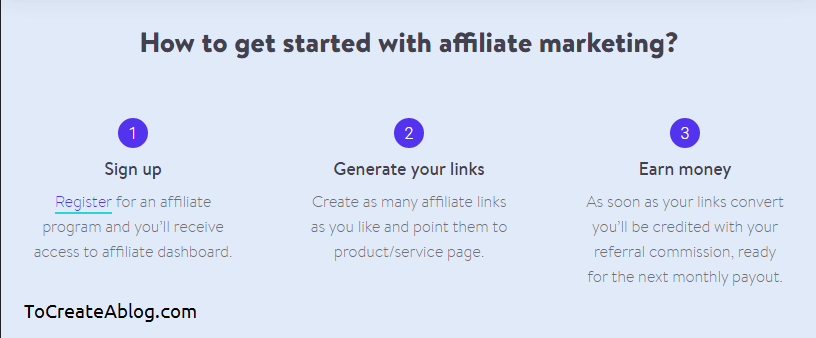
- Step 1: Join affiliate programs
- Step 2: Find links to promote products and services
- Step 3: Earn money
Few popular affiliate marketing networks, you can join to make money from your blog.
Create an account on above mentioned networks and find suitable products and services. Copy affiliate links and add them to your articles.
Create Memorable links: Affiliate links are ugly and too long, you can create totally readable, easily speakable, and exceptionally memorable short links using your WordPress-based website and domain name with Pretty Links plugins.
We have been using Pretty links plugins for a long time to create custom affiliate links. We don’t need to login to our affiliate network to find the link.
Pretty links make it easy to memorize the links and we can add links to any of our articles or we can share links on social media as well.
Here is an example of a link generated with Pretty links. https://tocreateablog.com/xtheme
Download pretty links now from the official website.
This is a very simple and easy process and you don’t need to invest a lot of money. You just need to create great content to promote a product.
You can write and publish review articles on your blog or a video review are also a great option.
You can upload videos to YouTube and embed them on your blog or if you want to publish videos exclusively on your blog, You can use JetPack Video Hosting feature to upload videos to be hosted on WordPress.com, rather than on your host’s servers.
You can then insert these videos on your self-hosted WordPress blog. This way your website’s performance won’t be affected.
JetPack Premium plan costs only $9 per month and offers unlimited video hosting.
How to receive payments from affiliates and customers?
There are many ways to receive your online payments. PayPal, Payoneer, Wire Transfer are few popular methods.
PayPal: is the most widely used service to send and receive online payments, and most of your online customers and affiliates pay via this service.
Payoneer: is another very popular service to receive payments from companies and marketplaces. You can connect your Amazon stores to receive all your Amazon payments. You can also get a Payoneer Mastercard to easily make payments or withdraw money from an ATM.
Generate income with Jetpack ads.
Many website and blogs make money by displaying ads. In the beginning, you won’t earn much but once you start getting high traffic, you will earn more.
Jetpack Ad program enables you to focus on creating great content while generating income.
If you write content regularly and have built an audience for your site, generating revenue from your traffic is something highly desirable.
Jetpack Premium can display high-quality ads from our approved advertisers allowing you to earn money when readers click an ad.
You need to get Jetpack Premium plan to display ads on your blog.
Final Words
That’s all for this almost 6500+ words guide to starting a personal or business blog from scratch without any technical knowledge.
We have also discussed how to make money from your blog as an affiliate marketer.
We tried our best to explain everything you need to know to start a great blog and make money from it as an individual or grow your business with a blog.
If you believe this is the perfect and ultimate guide to create a blog from scratch, please share it on Twitter, Facebook. Linkedin and with your email list.
Thank you very much for reading this guide to start a blog with WordPress.